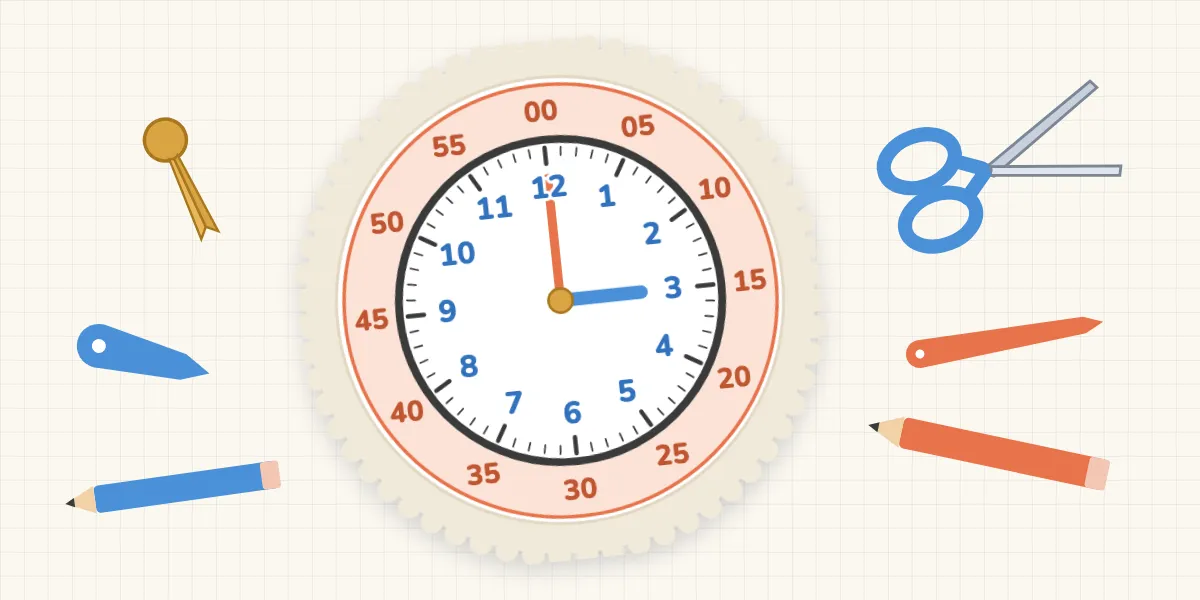
In short: A learning clock takes half an hour to make from a paper plate, two strips of card and a split pin. Three details matter: a short blue hour hand and a long orange minute hand, a ring of minutes around the rim, and moving the hour hand along as the minutes pass. Add games that link the clock to the daily routine and to movement.
You can buy teaching clocks anywhere. A home-made one has an advantage, though: your child builds the clock face number by number and afterwards knows why the 3 sits on the right and where the 15 minutes come from. This guide is designed so that the most common stumbling blocks of telling the time are cleared up while you craft.
Why is a hands-on clock worth it?
Because turning the hands shows children what a picture alone cannot. A meta-analysis of 55 studies from kindergarten to university found that maths teaching with concrete materials (manipulatives) did better than teaching with numbers and symbols only. The effect was clearest for retaining what was learned (Carbonneau et al., 2013). The researchers also stress that how well materials work depends on how they are used. A paper plate clock is not magic; it needs conversation and play.
A study from Tunisia with 232 first graders with maths learning difficulties fits this picture. One group learned the clock through movement games on a large clock painted on the playground, the other in regular lessons without movement games. The movement group improved significantly more in reading and recording times (Hawani et al., 2023). It is a single study, but a nice hint: learning the clock is allowed to be loud and active.
What do I need for a paper plate clock?
- a paper plate (plain, if possible)
- a split pin (brass paper fastener)
- a piece of blue and a piece of orange card
- a blue and an orange pen, plus a dark one for the tick marks
- scissors, a ruler, a hole punch or a thick needle (an adult makes the hole)
How do I make the clock step by step?
- Find the centre. Fold the plate in half, then fold it again the other way. Where the folds cross is the centre.
- Place the four anchor numbers. Where the folds meet the rim, write 12 at the top, 3 on the right, 6 at the bottom and 9 on the left, in blue.
- Add the other hours. Exactly two more numbers fit between each pair of anchors. Your child counts along: “After 12 come 1 and 2, then 3.”
- Write the minute ring. Round the outer rim, in orange: 00 above the 12, 05 above the 1, 10 above the 2 and so on up to 55. If you like, draw four small minute ticks in between.
- Cut out the hands. A short, wide hour hand from blue card and a long, thin minute hand from orange card. The minute hand reaches the minute ring; the hour hand only reaches the hour numbers.
- Put it together. Punch a hole in both hands, make a hole in the centre of the plate and join everything with the split pin: minute hand on top, hour hand underneath. Don’t bend the pin too tightly, so the hands can still turn.

Why two colours and a minute ring?
Because they head off exactly the mistakes children make most often. In a study of 725 primary school children, the most common error in grade 1 was looking at only one hand. Another frequent one was misreading the numbers, writing “three and ten” instead of “quarter past ten” (Burny et al., 2012).
The colours are our answer: blue belongs to the hour, orange to the minutes, on the hands and on the numbers. The orange ring makes visible what otherwise has to happen in the head: when the long hand points at the 3, the 15 is right above it. We do not know of a study that tests this exact colour coding. The design follows from the error analyses, not from proof that it works.
Why do I need to move the hour hand along?
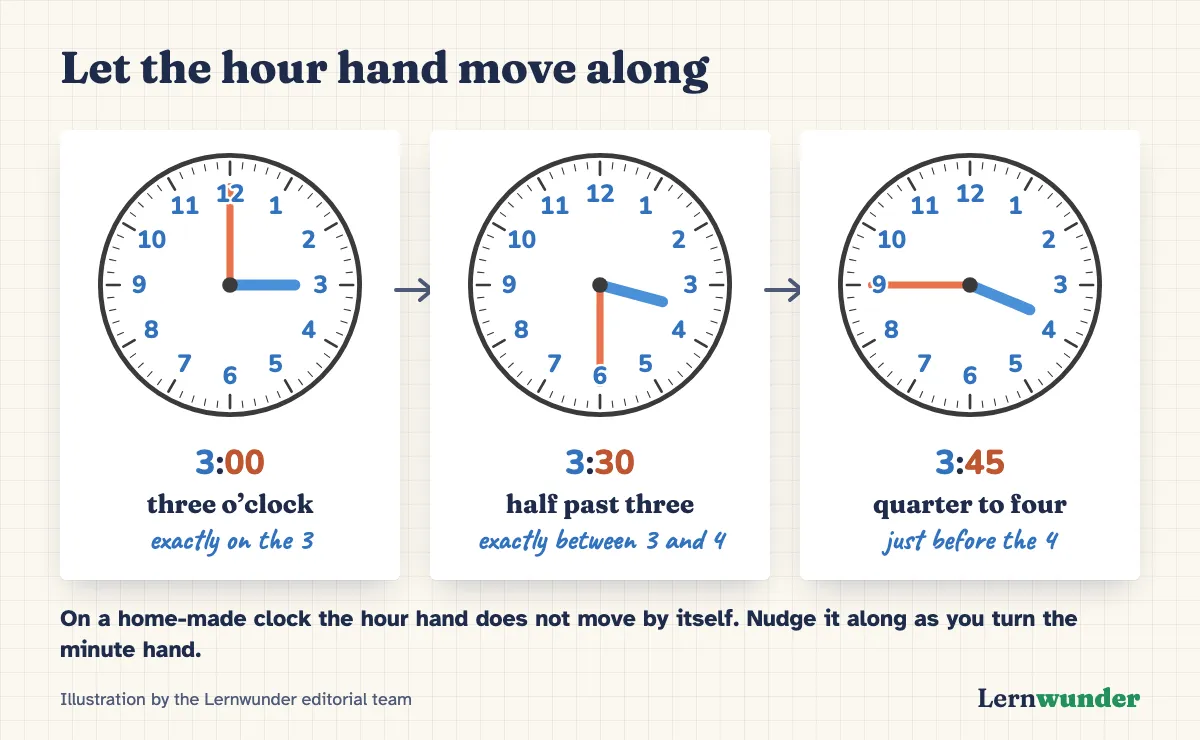
On a real clock the hour hand creeps forward. At half past three it sits exactly between 3 and 4; at quarter to four it is already just before the 4. A paper plate clock cannot do this on its own. So as you turn the minute hand, nudge the hour hand along and say it out loud: “Half an hour has gone, so the little hand is halfway to four.” Otherwise your child learns a wrong picture, which is exactly where later mix-ups with “quarter to” come from. More on this in why reading an analogue clock is so hard.
Which telling the time games go with the clock?
- My day on the clock. Children know their daily routine long before they can read clock times (Friedman & Laycock, 1989). Set the clock together: when do you get up? When is lunch? Draw small picture cards to go with it.
- Blue only. Take off the minute hand or leave it on the 12. One child sets an o’clock time, the other reads it.
- Clock echo. You set a time; your child copies it on a second clock or on a cuddly toy’s “wrist”.
- Walking in fives. Move the minute hand from 00 to 55 and count aloud in fives. Then backwards.
- Giant playground clock. Draw a big clock with chalk. One child is the hour hand (small steps), another the minute hand (long arms). Together they show the times you call out (inspired by Hawani et al., 2023).
- Spot the mistake. Set a time wrongly on purpose, for example “half past three” with the hour hand on the 4. Your child finds the mistake and explains it.
Play often and briefly; five to ten minutes is enough. And only move on when a step is secure. Which times are typical at which age is covered in when can children tell the time?.
What we are working on
We are currently working on Tinu Time, an app for learning to tell the time. Two ideas from this guide are ones we want to carry over exactly: hours in blue and minutes in orange, throughout, and a clock where the hour hand moves along when the minute hand is turned, just like a real clock. A paper plate clock does not replace that, and the app is not meant to replace the paper plate clock. They complement each other, and the craft has the bonus that children have built their clock face themselves.
Frequently asked questions
From what age can children make a learning clock? Preschoolers can join in, with help punching holes and writing. For games, start with o’clock times only.
Do I really need two colours? Not necessarily, but it helps to keep the hands and their numbers apart. What matters is that the colours stay the same everywhere.
What is a split pin? A paper fastener with a round head and two legs that you bend apart on the back. Stationery shops sell them.
Should I always write the minutes on? At the start, yes. Later you can cover the ring and see whether your child knows the minutes without help.
Sources
- Burny, E., Valcke, M. & Desoete, A. (2012). Clock reading: An underestimated topic in children with mathematics difficulties. Journal of Learning Disabilities, 45(4), 351–360. https://doi.org/10.1177/0022219411407773
- Carbonneau, K. J., Marley, S. C. & Selig, J. P. (2013). A meta-analysis of the efficacy of teaching mathematics with concrete manipulatives. Journal of Educational Psychology, 105(2), 380–400. https://doi.org/10.1037/a0031084
- Friedman, W. J. & Laycock, F. (1989). Children’s analog and digital clock knowledge. Child Development, 60(2), 357–371. https://doi.org/10.2307/1130982
- Hawani, A., Masmoudi, L., Trabelsi, O., Souissi, M. A., Ben Chikha, A., Mrayah, M., Souissi, N., Marsigliante, S., Rozmiarek, M. & Muscella, A. (2023). Enhancing time reading and recording skills in first-grade children with learning difficulties using the “Clock Motor Game”. Children, 10(11), 1748. https://doi.org/10.3390/children10111748
Lernwunder editorial team · Chaolan Lu